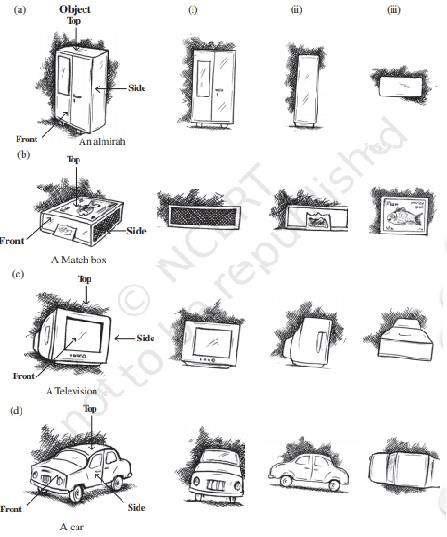
1. For each of the given solids, two views are given. Match for each solid the corresponding top and front views. The first one is done for you.

1. For each of the given solids, two views are given. Match for each solid the corresponding top and front views. The first one is done for you.
Explanation:
The top view of a 3D object typically shows the plan or layout of the object as if viewed from above. It displays the shape and dimensions of the object's top surface, often appearing as a flat representation of the object's outline. The front view of a 3D object, on the other hand, shows the object's shape and dimensions as if viewed from the front. It illustrates the height and depth of the object and can provide more detail on the object's features, such as curves or angles. Together, these views offer a comprehensive representation of the 3D object.
(a) (iii) (iv)
(b) (i) (v)
(c) (iv) (ii)
(d) (v) (iii)
(e) (ii) (i)
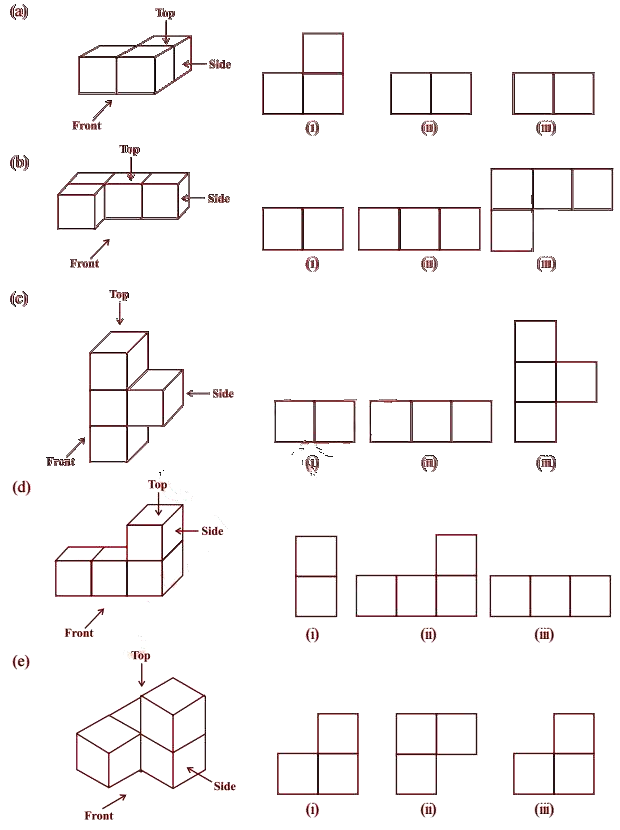
2. For each of the given solids, the three views are given. Identify for each solid the corresponding top, front and side views.

2. For each of the given solids, the three views are given. Identify for each solid the corresponding top, front and side views.
Explanation
The top view of a 3D object shows the shape of the object as viewed from above, while the front view displays the object's front-facing surface. The side view provides a perspective of the object's height and depth. Together, these views provide a comprehensive understanding of the 3D object's form and dimensions. The top, front, and side views are critical for designers, architects, and engineers to effectively plan, create and communicate their designs.
(a) (i) Front (ii) Side (iii) Top view
(b) (i) Side (ii) Front (iii) Top view
(c) (i) Front (ii) Side (iii) Top view
(d) (i) Front (ii) Side (iii) Top view
3. For each given solid, identify the top view, front view and side view.

3. For each given solid, identify the top view, front view and side view.
Explanation
The top, front, and side views of a 3D object provide different perspectives of its shape and dimensions. The top view displays the object's horizontal dimensions, while the front view shows its vertical dimensions. The side view provides information about the object's depth. Together, these views give a complete understanding of the 3D object. By examining all three views, one can visualize the object's size and shape, enabling accurate representation in drawings or computer models.
(a) (i) Top view (ii) Front view (iii) Side view
(b) (i) Side view (ii) Front view (iii) Top view
(c) (i) Top view (ii) Side view (iii) Front view
(d) (i) Side view (ii) Front View (iii) Top view
(e) (i) Front view (ii) Top view (iii) Side vi
4. Draw the front view, side view and top view of the given objects:

4. Draw the front view, side view and top view of the given objects:
Explanation
Drawing the front view, side view, and top view of an object requires a few steps:
Choose a reference point: Select a point on the object to act as a reference point, such as the center or a corner.
Draw the front view: Draw the front view by imagining the object placed directly in front of you. Sketch the visible features, such as height and width, using the reference point as a guide.
Draw the side view: Draw the side view by imagining the object turned to the side. Sketch the visible features, such as height and depth, using the reference point as a guide.
Draw the top view: Draw the top view by imagining the object from above. Sketch the visible features, such as width and depth, using the reference point as a guide.
Refine the drawings: Refine the drawings by adding details and adjusting proportions as needed.
Label the views: Label each drawing as the front view, side view, or top view for clarity.
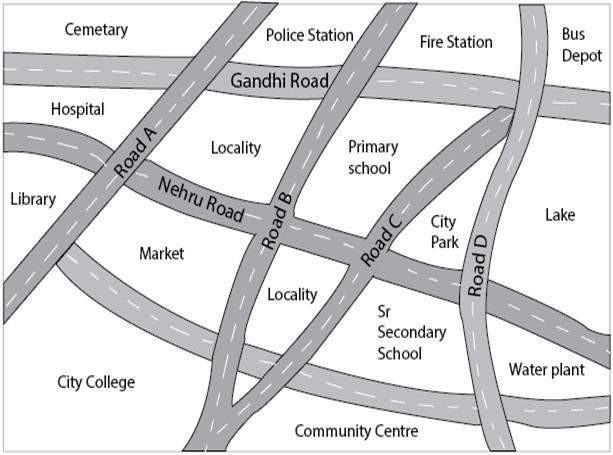
5. Look at the map given of the city.

Answer the following:
Color the map as follows: Blue – water, red – fire station, orange – library, yellow – schools, green – park, pink – college, purple – hospital, brown – cemetery.
(a) Mark a green ‘X’ at the intersection of Road C and Nehru Road, Green ‘Y’ at the intersection of Gandhi Road and Road A.
(b) In red, draw a short street route from the library to the bus depot.
(c) Which is further east, the city park or the market?
(d) Which is further south, the Primary School or the Sr. Secondary School?
5. Look at the map given of the city.
Answer the following:
Color the map as follows: Blue – water, red – fire station, orange – library, yellow – schools, green – park, pink – college, purple – hospital, brown – cemetery.
(a) Mark a green ‘X’ at the intersection of Road C and Nehru Road, Green ‘Y’ at the intersection of Gandhi Road and Road A.
(b) In red, draw a short street route from the library to the bus depot.
(c) Which is further east, the city park or the market?
(d) Which is further south, the Primary School or the Sr. Secondary School?
Explanation
(a).
(b).
(c) City Park
(d) Sr. Secondary School
6. Draw a map of your classroom using proper scales and symbols for different objects.
6. Draw a map of your classroom using proper scales and symbols for different objects.
Explanation
Drawing a map of your classroom using proper scales and symbols for different objects can be done by following these steps:
Measure the dimensions of the classroom: Use a measuring tape or ruler to measure the length and width of the classroom. Write down the measurements in inches or centimeters.
Choose a scale: Decide on a scale for your map. For example, you could use a scale of 1 inch = 1 foot or 1 centimeter = 1 meter.
Draw the outline of the classroom: On a piece of graph paper, draw the outline of the classroom using the scale you chose. For example, if the classroom is 30 feet by 20 feet, draw a rectangle on the graph paper that is 30 squares by 20 squares.
Add the furniture and other objects: Draw symbols for desks, chairs, cabinets, and other objects using the scale you chose. For example, a desk might be represented by a rectangle that is 1 inch by 2 inches, while a chair might be represented by a small circle.
Label the map: Add labels to the map for each object, such as "Teacher's Desk" or "Bookshelf."
Check your measurements and scale: Double-check that the measurements and scale are accurate by measuring the actual classroom and comparing it to your map.
By following these steps, you can create a detailed and accurate map of your classroom using proper scales and symbols for different objects.
7. Draw a map of your school compound using proper scale and symbols for various features like a playground, main building, garden etc.
7. Draw a map of your school compound using proper scale and symbols for various features like a playground, main building, garden etc.
Explanation
Drawing a map of your school compound using proper scale and symbols for various features like a playground, main building, garden, etc., can be done by following these steps:
Choose a scale: Decide on a scale for your map. For example, you could use a scale of 1 inch = 10 feet or 1 centimeter = 5 meters.
Measure the dimensions of the compound: Use a measuring tape or ruler to measure the length and width of the school compound. Write down the measurements in inches or centimeters.
Draw the outline of the compound: On a piece of graph paper, draw the outline of the school compound using the scale you chose. For example, if the school compound is 100 feet by 200 feet, draw a rectangle on the graph paper that is 10 squares by 20 squares.
Add symbols for the different features: Draw symbols for the main building, playground, garden, etc., using the scale you chose. For example, the main building might be represented by a rectangle that is 2 inches by 4 inches, while the playground might be represented by a square that is 1 inch by 1 inch.
Label the map: Add labels to the map for each feature, such as "Main Building" or "Playground."
Check your measurements and scale: Double-check that the measurements and scale are accurate by measuring the actual school compound and comparing it to your map.
By following these steps, you can create a detailed and accurate map of your school compound using proper scale and symbols for various features.
8. Draw a map giving instructions to your friend so that she reaches your house without any difficulty.
8. Draw a map giving instructions to your friend so that she reaches your house without any difficulty.
Explanation
Drawing a map giving instructions to your friend so that she reaches your house without any difficulty can be done by following these steps:
Choose a starting point: Choose a starting point that is easy to find, such as a major road or landmark.
Draw a map of the area: On a piece of paper, draw a map of the area using the scale you prefer. Be sure to include major roads, landmarks, and any other features that will help your friend find her way.
Mark your house: Use a symbol or color to mark your house on the map. Be sure to label it with your name and address.
Draw a route to your house: Draw a clear and easy-to-follow route to your house on the map, starting from the starting point you chose in step 1. Use arrows and labels to indicate turns and landmarks along the way.
Add instructions: Add written instructions to the map, describing each step of the route in detail. Include street names, landmarks, and other relevant information that will help your friend navigate.
Check the map: Double-check the map and instructions to make sure they are clear and easy to follow. Consider asking someone else to try following the map to see if they have any difficulty.
By following these steps, you can create a clear and detailed map with instructions that will help your friend reach your house without any difficulty.
9. Can a polyhedron have for its faces:
(i) 3 Triangles?
(ii) 4 triangles?
(iii) A square and four triangles?
9. Can a polyhedron have for its faces:
(i) 3 Triangles?
(ii) 4 triangles?
(iii) A square and four triangles?
Explanation
(i) No, A polyhedron is a three-dimensional solid with flat faces and straight edges. In order for a polyhedron to exist, it must have at least four faces. This is because a minimum of three planes are required to enclose a three-dimensional space, and each plane defines a flat face on the polyhedron.
Therefore, it is not possible for a polyhedron to have only three faces, as it would not meet the minimum requirement for the number of faces. In fact, the minimum number of faces a polyhedron can have been four, which is found in the tetrahedron, a type of pyramid-shaped polyhedron with four triangular faces.
(ii) Yes, it is true that a type of polyhedron called a tetrahedron can be described as a triangular pyramid with four triangular faces. The tetrahedron is a type of pyramid-shaped polyhedron with a triangular base and three triangular faces that meet at a single point, forming the apex of the pyramid. Therefore, it can also be described as a polyhedron with four faces, all of which are triangles.
(iii) Yes, that is correct. A square pyramid is a type of pyramid with a square base and four triangular faces that meet at a single point, forming the apex of the pyramid. Therefore, it can also be described as a polyhedron with five faces, one of which is a square and the other four are triangles. The square face is the base of the pyramid, while the four triangular faces are the sides that slope upwards to meet at the apex.
10. Is it possible to have a polyhedron with any given number of faces? (Hint: Think of a pyramid)
10. Is it possible to have a polyhedron with any given number of faces? (Hint: Think of a pyramid)
Explanation
The number of faces that a polyhedron can have been limited by a mathematical theorem called Euler's formula, which states that for any polyhedron, the number of faces (F), vertices (V), and edges (E) are related by the equation F + V - E = 2.
This means that the number of faces that a polyhedron can have been determined by the number of vertices and edges it has and is not arbitrary. For example, a pyramid with a square base has 5 faces (1 square and 4 triangles), 5 vertices, and 8 edges. Using Euler's formula, we can verify that F + V - E = 5 + 5 - 8 = 2.
It is possible only if the number of faces is greater than or equal to 4.
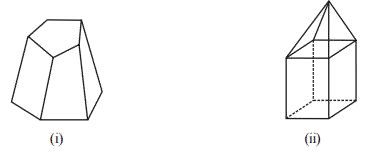
11. Which are prisms among the following:

11. Which are prisms among the following:
Explanation
To be classified as a prism, an object must have certain properties. These include:
Two parallel bases: A prism must have two congruent, parallel bases that are parallel to each other.
Lateral faces: The sides of a prism are called its lateral faces. A prism must have at least three lateral faces, and all of these faces must be parallelograms. The lateral faces connect the corresponding sides of the two bases.
Edges: A prism has edges, which are the lines where two faces meet. A prism has twice as many edges as its bases has sides.
Height: The height of a prism is the perpendicular distance between its two bases. The height of the prism is the same for all of its lateral faces.
(i) A nail:
It is not a prism, it is a long, slender, pointed metal object used for fastening materials together. A nail does not have two parallel bases, nor does it have a set of parallelogram faces connecting the corresponding sides of two bases. Rather, it has a single pointed end and a flat head or other gripping mechanism on the other end.
(ii) Unsharpened pencil:
An unsharpened pencil is typically a hexagonal prism, which is a type of prism with a hexagonal base and six parallelogram faces that connect the corresponding sides of the two bases. The hexagonal base of the pencil is what makes it a hexagonal prism, while the six faces are the lateral faces of the prism.
(iii) A table weight:
A table weight is not a prism because it does not have the defining characteristics of a prism. A prism is a three-dimensional solid that has two congruent, parallel bases and a set of parallelogram faces connecting them. A table weight, on the other hand, is a three-dimensional solid that typically has a rounded or irregular shape and does not have any parallel bases or parallelogram faces.
While a table weight may have faces and edges, it does not meet the criteria for being a prism because it does not have two parallel bases and parallelogram faces connecting them. Therefore, a table weight is not a prism.
(iv) A box:
A box is a type of prism because it meets the definition of a prism. A prism is a three-dimensional solid that has two congruent, parallel bases and a set of parallelogram faces connecting them. A box has six faces, all of which are rectangles or squares. The opposite faces of the box are congruent and parallel to each other, which satisfies the condition of having two congruent, parallel bases. The remaining four faces of the box are also parallelograms since they are rectangles or squares.
Since a box has two congruent, parallel bases and parallelogram faces connecting them, it meets the criteria for being a prism. Therefore, a box is a type of prism.
12. (i) How are prisms and cylinders alike?
(ii) How are pyramids and cones alike?
12. (i) How are prisms and cylinders alike?
(ii) How are pyramids and cones alike?
Explanation
(i) Prisms and cylinders are similar in that they are both three-dimensional shapes with uniform cross-sections. A prism is a solid shape that has two congruent, parallel bases and parallelogram faces connecting them, while a cylinder has two parallel circular bases and a curved surface that connects them.
Both prisms and cylinders have the same cross-section throughout their length, which means that if a plane were to slice through them parallel to their bases, the resulting shape would be the same at every cross-section. For example, if a cylinder were sliced parallel to its base, the resulting shape would be a circle at every cross-section. Similarly, if a prism were sliced parallel to its base, the resulting shape would be a congruent polygon at every cross-section.
(ii) Pyramids and cones are similar in that they both have a single base and a vertex. Both pyramids and cones are three-dimensional shapes that taper to a point at the vertex. The main difference between the two is the shape of their base. A pyramid has a polygonal base, while a cone has a circular base.
Both pyramids and cones are classified based on the shape of their base. For example, a square pyramid has a square base and four triangular faces that converge at a single vertex, while a cone has a circular base and a curved surface that tapers to a single point. The faces of both pyramids and cones are triangular in shape, with the difference being that the faces of a pyramid are planar while the faces of a cone are curved.
13. Is a square prism the same as a cube? Explain.
13. Is a square prism the same as a cube? Explain.
Explanation
No, a square prism is not the same as a cube. Although they are similar in that they are both three-dimensional shapes with six faces, the properties of a square prism and a cube are different.
A square prism is a solid shape that has two congruent, parallel square bases and four rectangular faces connecting the bases. A cube, on the other hand, is a special type of prism in which all six faces are congruent squares. In other words, a cube is a type of square prism with square faces on all six sides.
One key property that distinguishes a square prism from a cube is the ratio of the length to the height of the shape. In a square prism, the length and height are not equal, as the rectangular faces connecting the bases have different dimensions. In a cube, however, all six faces are congruent squares, so the length and height are equal. Another property that distinguishes a square prism from a cube is the number of diagonals. A cube has 11 diagonals, while a square prism has only 8 diagonals.
14. Verify Euler’s formula for the given solids.

14. Verify Euler’s formula for the given solids.
Explanation
(i) Let's verify whether Euler's formula holds true for the given values of the number of faces (F), edges (E), and vertices (V) of a polyhedron:
F = 7, E = 15, V = 10
Using Euler's formula: V - E + F = 2 we get 10 - 15 + 7 = 2
Therefore, Euler's formula holds true for this polyhedron as well, as 10 - 15 + 7 = 2.
This verifies that Euler's formula is true for this polyhedron with 7 faces, 15 edges, and 10 vertices.
(ii) F = 9, E = 16, V = 9
Using Euler's formula: V - E + F = 2 we get 9 - 16 + 9 = 2
Therefore, Euler's formula holds true for this polyhedron as well, as 9 - 16 + 9 = 2.
This verifies that Euler's formula is true for this polyhedron with 9 faces, 16 edges, and 9 vertices.
15. Using Euler’s formula, find the unknown:
15. Using Euler’s formula, find the unknown:
Explanation
Euler’s formula: F + V – E = 2
Where, F = Faces, V = Vertices and E = Edges
(i) V = 6, E = 12, F =?
Using Euler's formula: V - E + F = 2, we can rearrange it as F = E - V + 2
Substituting the given values, we get F = 12 - 6 + 2 = 8
Therefore, the number of faces for this polyhedron is 8, with 6 vertices and 12 edges.
(ii) Euler's formula states that V - E + F = 2.
Substituting the given values, we get:
V - 9 + 5 = 2
Simplifying the equation, we get:
V = 2 + 9 - 5
V = 6
Therefore, when F = 5 and E = 9, the number of vertices (V) is 6.
(iii) V - E + F = 2
Substituting the given values, we get:
12 - E + 20 = 2
Simplifying, we get:
-E + 32 = 2
Adding E to both sides, we get:
32 = E + 2
Subtracting 2 from both sides, we get:
E = 30
Therefore, the number of edges (E) for a polyhedron with 20 faces and 12 vertices is 30.
16. Can a polyhedron have 10 faces, 20 edges and 15 vertices?
16. Can a polyhedron have 10 faces, 20 edges and 15 vertices?
Explanation
We can use Euler's formula to check if a polyhedron can have 10 faces, 20 edges, and 15 vertices or not.
V - E + F = 2
Substituting the given values, we get:
15 - 20 + 10 = 2
Simplifying, we get:
5 = 2
Therefore, it is not possible for a polyhedron to have 10 faces, 20 edges, and 15 vertices.


